Showing posts with label outdoor mapping. Show all posts

Tuesday, 12 May 2015

Uploading Feature layers from ArcMap 10.2 to store as waypoints, routes and tracks in a GPS receiver


 Youtube download link

Document1-001

Task
To upload feature layers in Arcmap 10.2 and store them as waypoints, routes and tracks in a GPS receiver.

Things to note

- Arcmap 10.2 just like google earth, only recognizes two types of GPX files- Waypoint and Tracks.
- ArcMap 10.2 has a GPS extension but this comes with a serial com port connection.
-DNR GPS plugin seems to have some technical issues in ArcMap 10.2 but works great with Arcmap 9.


Document1-001


Thanks for viewing, head for the comments sections or feedback page and share your thoughts.

Tuesday, 5 May 2015

Uploading Points from a Google image to store as waypoints in a GPS receiver


 youtube video link


Overview
Place markers in google earth can be points, lines or area features representing spatial locations . This presentation demonstrates how to place mark locations on a google satellite image, convert their format so one can store them as waypoints in a GPS receiver.


Task
The team has been given the task of identifying and carrying out a physical inspection of empty parcels of land within the city limits. We intend to use this process to map spatial data on the empty parcels and store the locations in our GPS receivers as waypoints. We will then use the GPS receiver to navigate to these waypoints for physical inspection.
Softwares- Google Earth, DNRGPS,
Hardware- Laptop, Garmin Dakota 10 handheld GPS receiver.

Procedure – Three step approach
Step one- Map waypoints from the google image and save as KML file
1. Launch Google Earth. Search for the vicinity of the study area. In the places window, right click>Add>Folder
vb

2. Name the folder – empty plots. Go to the main menu and select the pushpin icon or Add Placemark button (encircled red). A dialog box and a yellow pushpin will appear on the image. Use the mouse to drag the pushpin and position it on the point of interest (in this case, empty plots). Go to the dialog box and name it, notice that the X and Y position of the points are displayed (green box) in the dialog box. Click OK. As you can see, the named point will appear on the image.

gh

3. Select two more points and right click on the empty plots folder>Save place as. Notice that all the just created placemarks are in the empty plots folder.
pix3

4. In the save file dialog box, *save type as Kml
pix4

  Step two- Use DNR GPS to convert from Kml format to GPX format.
5. Launch DNR GPS and after that connect your GPS device to the laptop or PC. Go to File>Load from>file.

pix 5

6. Navigate to the folder where the saved Kml file (empty plots) is stored and click open.
er

7. The place markers from google image still in Kml file format are loaded into DNR GPS
pix 7

8. Go again to File>Save to>File. We are now converting the Kml file to GPX file format. GPS receivers store gps data as GPX format. A Save To File dialog box will open (no.9)
Screenshot 2015-04-26 03.32.38(2) 

9. In the Save To File dialog box, change the file format to GPS Exchange Format (red boxed) to convert our empty plots kml file to *gpx file format.
Screenshot 2015-04-26 03.37.43

Step three- Uploading Waypoints to a GPS receiver
10. Connect the GPS receiver by USB or Serial port. Go to GPS>Connect to Default GPS. If this doesn’t work, try the Find GPS
Screenshot 2015-04-26 03.40.30

11. Once the GPS is connected, it will show up on the menu. Go to Waypoint>Upload
Screenshot 2015-04-26 03.40.52 

12. The dialog box will appear to fill in a name for the uploaded data. This process saves the Waypoints in the GPS receiver.
Screenshot 2015-04-26 03.41.18

13. A message box indicating complete upload. Disconnect the GPS receiver, power it up and check for the point1, point2 and point3.
Screenshot 2015-04-26 03.41.29(2)

hope you liked the posting.

feel free to send your comments and feedback.

Send your comment and feedback

Wednesday, 15 April 2015

Handheld GPS Receiver Units- an Essential tool for the Mapping enthusiast

Click link to see images of handheld GPS Units


Handheld Global Positioning System (GPS) receivers are GPS enabled devices that are portable and are adapted for mobile and outdoor activity such as hiking, biking and even some utility mapping. Suffice to say that even some professionals still find them handy and accurate to a specification. They come in many brand names, with many specifications but are generally classified by price into low, mid and top range models. They can also be classified by function into mapping grade, biking, hiking and marine.

These devices have seen a massive improvement in their design, hardware and software specifications. Many of the leading brands such as Magellan and Garmin have gone ahead to develop cloud based platforms as well as imagery download capabilities in their mid-priced ranges. In addition, the brands have led aggressive marketing to promote the appeal of these devices to the less professional and recreational users.

Mapping grade handheld GPS devices usually come with four standard functions namely-Waypoint, Route, Track and Navigation. These functions give the user the tools to represent real life features properly as well as find his or her way around. They come with a base map and enables the user to capture points, lines and calculate area features and view on a map. They store the data that is captured on the field, with some mid-priced ranges able to store 1000 units of data outside of the memory card. Basically the degree and sophistication of functions drive the price tag.

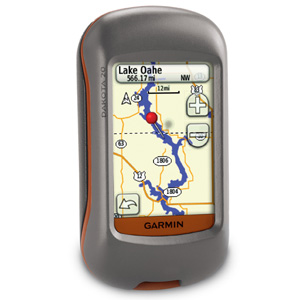
My favourite handheld tool for a while had been the Garmin GPSMAP 78s. It has a rugged feel and a good sized screen, but it is now way behind in the trend of things today. I got a Garmin Dakota 20 recently and it sports a larger screen,touchscreen and has an interface that is easier (at least by me) to input data. In everything, best of all is the price because for some of the power it packs, it comes at a low to mid-price range of between 180 to 220 dollars.

Nowadays, top range handheld GPS receivers are bundled with a variety of additional high tech software and hardware capabilities such as inbuilt cameras, health and ergonomic monitors, cloud based connections, internet sharing and so on. They could cost anything from 800 to 1500 dollars.

Handheld GPS devices are outdoor tools so they are made to be rugged, float on water and weather resistant. Some are equipped with marine charts and this is normally indicated in the marketing prose.

One of the great things about handheld GPS is the ability to download your data after working on a trip, hike or even serious professional activities.  Most of them come with downloading USB cables and proprietary interface software. We will choose a later post to talk more about downloading and uploading GPS data.

Hope you have gotten that bit of basic information on handheld GPS receiver units. Let us have your comments please

Next post, we debate the myths and facts behind the Handheld GPS receiver!!!